MyTardis + MyData & PostgreSQL


The following are updated steps on setting up the latest production-ready versions of MyTardis (v4.3.0) and MyData (MyData_v0.3.2-98-g0149bd8) on a virtual machine with Ubuntu 18.04. This is an update from the MyTardis and You and also features steps for setting up PostgreSQL as the backend database.
While my example implementation is empty of data, it is up and running here.

The following resources were referenced for this blog:
- MyTardis Installation
- MyTardis Architecture
- virtualenvwrapper Shell Startup File
- Initial Server Setup with Ubuntu 18.04
- How To Set Up Django with Postgres, Nginx, and Gunicorn on Ubuntu 18.04
- Django Settings Documentation
- How To Install Nginx on Ubuntu 18.04
- How To Use Celery with RabbitMQ to Queue Tasks on an Ubuntu VPS
- How To Secure Nginx with Let's Encrypt on Ubuntu 18.04
- MyData server app installation
- MyData Desktop app download
- MyData Desktop app setup
- MyData Tutorial
- MyData Upload Methods
Several other resources are also hyperlinked throughout the remainder of this blog.
Setup your Domain Name
First, set up your @ and www custom resource records under the DNS for your domain name. Part 6 of my blog post on Cloud Platforms, CentOS 7, and Ghost provides some detail on how to accomplish this. Google Domains has since updated their layout so the screen shots will differ from reality, but the essence is still the same.
Create a Sudo User & Enable Firewall
## while logged in as root, create sudo user 'tardis'
adduser tardis
[enter password]
usermod -aG sudo tardis

## now give tardis root privledges (if you need to)
visudo
## this opens nano, a text editor
## under 'root ALL=(ALL:ALL)ALL', add:
tardis ALL=(ALL:ALL)ALL

## now ctrl-x and select y to save changes
Enable your firewall
ufw app list
## Allow SSH connections:
ufw allow OpenSSH
## enable the firewall by typing:
ufw enable
## check the status of allowed ports:
ufw status
Pull MyTardis & MyData & install dependencies
## navigate to base directory
cd /opt
## swap to tardis user
su - tardis
## using sudo for the first time will prompt for the user password
sudo ls
[enter password]

## MyTardis
sudo git clone -b master https://github.com/mytardis/mytardis.git
cd mytardis
# install MyTardis requirements
sudo bash install-ubuntu-py3-requirements.sh

## mydata app
cd tardis/apps/
sudo git clone https://github.com/mytardis/mytardis-app-mydata mydata

## move up a directory
cd ..

## python, postgressql, nginx, curl, rabbitMQ
sudo apt install python3-pip python3-dev libpq-dev postgresql postgresql-contrib nginx curl rabbitmq-server -y

## install certbot
sudo add-apt-repository ppa:certbot/certbot
[enter]
sudo apt install python-certbot-nginx -y
Setup PostgresSQL
## login to postgres with the postgres user
sudo -u postgres psql
## enter the following psql commands to create the db
CREATE DATABASE tardis_db;
## add a password
CREATE USER tardis WITH PASSWORD 'yourpassword';
## set tardis time zone settings
ALTER ROLE tardis SET client_encoding TO 'utf8';
ALTER ROLE tardis SET default_transaction_isolation TO 'read committed';
ALTER ROLE tardis SET timezone TO 'UTC';
## give privileges to tardis to work with the db
GRANT ALL PRIVILEGES ON DATABASE tardis_db TO tardis;
ALTER USER tardis CREATEDB;
## quit out of psql
\qInstall virtualenvwrapper
A virtual environment is a workspace that has everything you need pre-installed inside of it. Think about how nice it would be to quickly toggle between multiple projects with different dependencies and settings. That's the utility of virtualenv for Python. Virtualenvwrapper and virtualenv need the sudo -H flag with pip when not the root user.
## virtualenvwrapper pip3 installation
sudo -H pip3 install --upgrade pip
sudo -H pip3 install virtualenvwrapper
sudo -H pip3 install virtualenv
Add a few lines to the shell startup file ~/.bashrc
The lines that are added into your ~/.bashrc shell startup file essentially tell your computer where your virtualenvs are stored and what version of Python you want your virtualenvs to use.
As an alternative, you could create custom/.profileshell startup files that use different versions of Python or different virtualenvs storagelocat/.profileshell startup files that use different versions of Python or different virtualenvs storage locations. You can think of your~/.profileas the custom settings you would have to load prior to initializing a virtualenv. For now, we're just going to use~/.bashrc.
sudo vim ~/.bashrcAdd lines to ~/.bashrc
export WORKON_HOME=$HOME/.virtualenvs
export PROJECT_HOME=$HOME/Devel
export VIRTUALENVWRAPPER_PYTHON=/usr/bin/python3
source /usr/local/bin/virtualenvwrapper.sh
# Write and quit VIM
:wq
Run the shell startup file
source ~/.bashrcActivate your project's virtual environment
mkvirtualenv mytardis
To work with any virtualenv after creation, run the command:workon [YourEnvName]e.g.,workon mytardis
Pip install the requirements for MyTardis
## move up a directory
cd ..
## install requirements into mytardis virtual environment
pip install -U pip
pip install -U -r requirements.txt
pip install -U -r requirements-postgres.txt
Pip install the requirements for MyData
## cd into the mydata app
cd tardis/apps/mydata
pip install -U -r requirements.txt
Create MyData receiving and complete default directories
## if not already tardis user, then
su tardis
## setup MyData directories
# -p recursively makes directories
sudo mkdir -p /opt/mytardis/mydata_storage/receiving
sudo mkdir -p /opt/mytardis/mydata_storage/complete
Create a new file, tardis/settings.py
MyTardis has default settings, but these can be overwritten by any custom settings you place in this tardis/settings.py file. For example, if you want to use PostgreSQL instead of sqlite3, you can specify that information in this file. Once you have a copy of MyTardis up and running with no issues, you can change DEBUG = False; initially, however, I would recommend leaving it as True. If there is an internal issue with the database or server settings, the developer will be able to see what the error message is with DEBUG = True. While False, the developer will simply be navigated to a generic load error web page with no revealing information. See Django Settings Documentation for some additional Django settings, or the Extended configuration settings from MyTardis documentation.
# move back to base mytardis directory
cd /opt/mytardis

sudo vim tardis/settings.py
Fill the file with the following settings:
from .default_settings import *
from pathlib import Path
import os

# Build paths inside the project like this: BASE_DIR / 'subdir'.
BASE_DIR = Path(__file__).resolve().parent.parent

# Add site specific changes here
ALLOWED_HOSTS = ['your_domain.com', 'www.your_domain.com', 'localhost']
#ALLOWED_HOSTS = ['server_ip_address', 'localhost']

# additional applications
INSTALLED_APPS += ('tardis.apps.mydata',)

# Turn on django debug mode.
DEBUG = True

# Swapped to postgressql
# The database needs to be named something other than "tardis" to avoid
# a conflict with a directory of the same name.
DATABASES['default']['ENGINE'] = 'django.db.backends.postgresql_psycopg2'
DATABASES['default']['NAME'] = 'tardis_db'
DATABASES['default']['USER'] = 'tardis'
DATABASES['default']['PASSWORD'] = 'yourpassword'
DATABASES['default']['HOST'] = 'localhost'

# It is recommended to pass protocol information to Gunicorn. Many web frameworks use this
# information to generate URLs. Without this information, the application may mistakenly
# generate ‘http’ URLs in ‘https’ responses, leading to mixed content warnings or broken applications.
SECURE_PROXY_SSL_HEADER = ('HTTP_X_FORWARDED_PROTO', 'https')

# Next, move down tot he bottom of the file and add a setting indicating where the static files should
# be placed. This is necessary so that Nginx can handle requests of these items. The following line tells
# Django to place them in a directory called static in the base project directory:
STATIC_URL = '/static/'
STATIC_ROOT = os.path.join(BASE_DIR, 'static/')

## MyData settings
DEFAULT_RECEIVING_DIR = os.path.join(BASE_DIR,'mydata_storage/receiving/')
DEFAULT_STORAGE_BASE_DIR = os.path.join(BASE_DIR, 'mydata_storage/complete/')
# Write and quit VIM
:wqDefault permissions
To prevent any potential permission issues, set the ownership of the mytardis workspace to the tardis:tardis sudo username.
cd /opt

# set file permissions for user tardis
sudo chown -R tardis:tardis /opt/mytardis/
sudo chmod -R 755 /opt/mytardis/
If there are persistent permission issues, you may need to recheck permissions with ls -l. At the most, you could sudo chmod -R 755 mytardis/, which would recursively set permissions to all files for users to read and execute.
Next, you will need to create a SECRET_KEY.
The MyTardis documentation states that this key "is important for security reasons". Python must be active for this command to run workon mytardis. It is a short script that appends a random 50 character key to the bottom of your settings.py file:
cd /opt/mytardis

sudo python -c "import os; from random import choice; key_line = '%sSECRET_KEY=\"%s\"  # generated from build.sh\n' % ('from .default_settings import * \n\n' if not os.path.isfile('tardis/settings.py') else '', ''.join([choice('abcdefghijklmnopqrstuvwxyz0123456789@#%^&*(-_=+)') for i in range(50)])); f=open('tardis/settings.py', 'a+'); f.write(key_line); f.close()"
Initialization
Create and configure the MyTardis database tables:
python manage.py migrate
python manage.py createcachetable default_cache
python manage.py createcachetable celery_lock_cache
Migrate MyData database tables:
python manage.py makemigrations mydata
# - Alter field interface on uploader
python manage.py migrate mydata
Load MyData's default experiment schema:
python manage.py loaddata tardis/apps/mydata/fixtures/default_experiment_schema.json
# Installed 4 object(s) from 1 fixture(s)
Next, create a superuser:
python manage.py createsuperuser
tardis
[enter password]
Install JavaScript dependencies for production and for testing
npm install && npm testIf you show javascript related errors on deployment of MyTardis, re-run npm install && npm test after setting up nginx and letsencrypt.
Test the deployment of MyTardis
The following command will allow you to navigate via web browser to your MyTardis deployment.
## Create an exception for port 8000 by typing:
sudo ufw allow 8000
python manage.py runserver 0.0.0.0:8000Gunicorn
If you were able to access the MyTardis deployment, ctrl+c out and test gunicorn's ability to serve up MyTardis:
gunicorn --bind 0.0.0.0:8000 wsgiCheck if website is still running with gunicorn -- if yes, CTRL-C
## now leave venv:
deactivate
Creating systemd Socket and Service Files for Gunicorn
We have tested that Gunicorn can interact with our Django application, but we should implement a more robust way of starting and stopping the application server. To accomplish this, we’ll make systemd service and socket files. The Gunicorn socket will be created at boot and will listen for connections. When a connection occurs, systemd will automatically start the Gunicorn process to handle the connection.
Create a gunicorn.socket file
sudo vim /etc/systemd/system/gunicorn.socketFill the file with the following settings:
[Unit]
Description=gunicorn socket

[Socket]
ListenStream=/run/gunicorn.sock

[Install]
WantedBy=sockets.target
# Write and quit VIM
:wqCreate a gunicorn.service file
sudo vim /etc/systemd/system/gunicorn.serviceFill the file with the following settings:
[Unit]
Description=gunicorn daemon
After=network.target

[Service]
User=tardis
Group=tardis
WorkingDirectory=/opt/mytardis
ExecStart=/home/tardis/.virtualenvs/mytardis/bin/gunicorn \
	  -c file:/opt/mytardis/gunicorn_settings.py \
	  -b unix:/run/gunicorn.sock \
	  --log-syslog \
          wsgi:application

[Install]
WantedBy=multi-user.target
# Write and quit VIM
:wqEnable and test the gunicorn.socket
# We can now start and enable the Gunicorn socket.
sudo systemctl start gunicorn.socket
sudo systemctl enable gunicorn.socket

# Checking for the Gunicorn Socket File
sudo systemctl status gunicorn.socket
# Testing Socket Activation
sudo systemctl status gunicorn

# == html if working
curl --unix-socket /run/gunicorn.sock localhost

sudo systemctl status gunicorn
If the output from curl or systemctl status gunicorn indicates that a problem occurred, check the error logs, fix the issues presented, and restart and reload gunicorn by running the following commands:
# Check logs
sudo journalctl -u gunicorn

# Restart and reload after changing the socket or service files
sudo systemctl daemon-reload
sudo systemctl restart gunicorn
Create a celeryworker.service file
Celery workers run asynchronous MyTardis tasks, which are essentially tasks that can run in the background and be prioritized based on website use.
sudo vim /etc/systemd/system/celeryworker.service[Unit]
Description=celeryworker daemon
After=network.target
[Service]
User=tardis
Group=tardis
WorkingDirectory=/opt/mytardis
Environment=DJANGO_SETTINGS_MODULE=tardis.settings
ExecStart=/home/tardis/.virtualenvs/mytardis/bin/celery worker \
-A tardis.celery.tardis_app \
-c 2 -Q celery,default -n "allqueues.%%h"
[Install]
WantedBy=multi-user.target# Write and quit VIM
:wqCreate a celerybeat.service file
sudo vim /etc/systemd/system/celerybeat.service[Unit]
Description=celerybeat daemon
After=network.target
[Service]
User=mytardis
Group=mytardis
WorkingDirectory=/opt/mytardis
Environment=DJANGO_SETTINGS_MODULE=tardis.settings
ExecStart=/home/tardis/.virtualenvs/mytardis/bin/celery beat \
-A tardis.celery.tardis_app --loglevel INFO
[Install]
WantedBy=multi-user.target# Write and quit VIM
:wq## reload the daemon to reread the service definition and restart gunicorn:
sudo systemctl daemon-reload
sudo systemctl restart gunicornConfigure Nginx with Gunicorn and LetsEncrypt
Create a file to configure Nginx for your domain (HTTP initially)
sudo vim /etc/nginx/sites-available/your_domain.comFill the file with the following settings:
upstream mytardis {
    server unix:/run/gunicorn.sock;
    server 0.0.0.0:8000 backup;
}
server {
    listen 80;
    #server_name 127.0.0.1;
    server_name your_domain.com www.your_domain.com;
    return 301 https://$server_name$request_uri;
}
server {
    listen 443 default_server ssl;
    #server_name 127.0.0.1;
    server_name your_domain.com www.your_domain.com;

    # HSTS (ngx_http_headers_module is required) (15768000 seconds = 6 months)
    add_header Strict-Transport-Security max-age=15768000;

    client_max_body_size 4G;
    keepalive_timeout 5;

    gzip off;  # security reasons
    gzip_proxied any;
    # MyTardis generates uncompressed archives, so compress them in transit
    gzip_types application/x-javascript text/css;
    gzip_min_length 1024;
    gzip_vary on;

    location / {
        proxy_set_header X-Forwarded-For $proxy_add_x_forwarded_for;
        proxy_set_header X-Forwarded-Proto $scheme;
        proxy_set_header Host $http_host;
        proxy_redirect off;
        proxy_pass http://mytardis;
        client_max_body_size 4G;
        client_body_buffer_size 8192k;
        proxy_connect_timeout 2000;
        proxy_send_timeout 2000;
        proxy_read_timeout 2000;
    }

    location /static/ {
        expires 7d;
        alias /opt/mytardis/static/;
    }
}
# Write and quit VIM
:wqCreate a hard link ln between the file you just created and those listed as enabled by nginx:
sudo ln -s /etc/nginx/sites-available/[YourWebsite].com /etc/nginx/sites-enabled
# test nginx
sudo nginx -t
sudo systemctl restart nginx
If Nginx failed to start, check the logs, make changes, then reload and restart the Nginx service:
# check for more errors
sudo systemctl status nginx.service
sudo journalctl -u nginx

# reload and restart the nginx service file
sudo systemctl reload nginx && sudo systemctl restart nginx
sudo nginx -t
Once Nginx is successful, then update the firewall to allow Nginx and remove the 8000 port:
sudo ufw delete allow 8000
sudo ufw allow 'Nginx Full'

sudo ufw status
ufw status printout should look like the following:
OpenSSH ALLOW Anywhere
Nginx Full ALLOW Anywhere
OpenSSH (v6) ALLOW Anywhere (v6)
Nginx Full (v6) ALLOW Anywhere (v6)
Setting up HTTPS with Certbot and Nginx
sudo certbot --nginx -d your_domain.com -d www.your_domain.com
[enter email]
[A]
[n]
[2]
Step 5 — Verifying Certbot Auto-Renewal
sudo certbot renew --dry-runCollect static files to settings.STATIC_ROOT
workon mytardis
python manage.py collectstatic

# leave venv
deactivate
In order for Django to work, there needs to be a collection of "static" files within a directory. Static files are essentially copies of the original CSS and HTML. If this directory is not specified in the Nginx configuration file, then your pages will load with no CSS while DEBUG = True. If DEBUG = False, you will just be redirected to a generic error page.
If there are issues related to static files (i.e., CSS, javascript, images), then it is likely related to Nginx's permission to 'read' these files. Documentation suggests using the following commands to allow reading static:
# allow Nginx read permissions
setfacl -R -m user:nginx:rx /opt/mytardis/static/

# Test and reload Nginx
sudo nginx -t
sudo systemctl reload nginx && sudo systemctl restart nginx
Setting Up MyData
MyData provides a tutorial on setting up a demo of the MyData app, the general steps were as follows:
- Login to your admin (your_domain.com/admin) and add the following (MyData Tutorial):
- Verify the MyData app is accessible via admin; there will be a new section called "MYDATA" with UploaderRegistrationRequests, UploaderSettings, and Uploaders as subheadings
- Verify the experiment default schema from mydata
loaddatauploaded by selecting the Schema subheading under "TARDIS_PORTAL" - Add 'Test Facility' to the Facilities subheading and add the Manager group 'mydata-default-permissions'
- Add 'Test Microscope' to the Instruments subheading and add it to 'Test Facility'
- Add users to the Users subheading: 'testfacility' (with mydata-default-permissions), 'testuser1', and 'testuser2'
- Add storageboxes to the same directories estabished in settings.py: receiving and default
- Select Api keys under the "TASTYPIE" heading, "Add an Api key", search for the testfacility user, then click save and an API Key will automatically generate
- Setup SCP via Staging:
- Download and install the MyData Desktop application
- Download the MyData test data
- Create mydata_configs.cfg file: MyDataDemo.cfg from MyData Tutorial
- Drag and drop config file into MyData and it will automatically populate
- Click on 'Test Run'
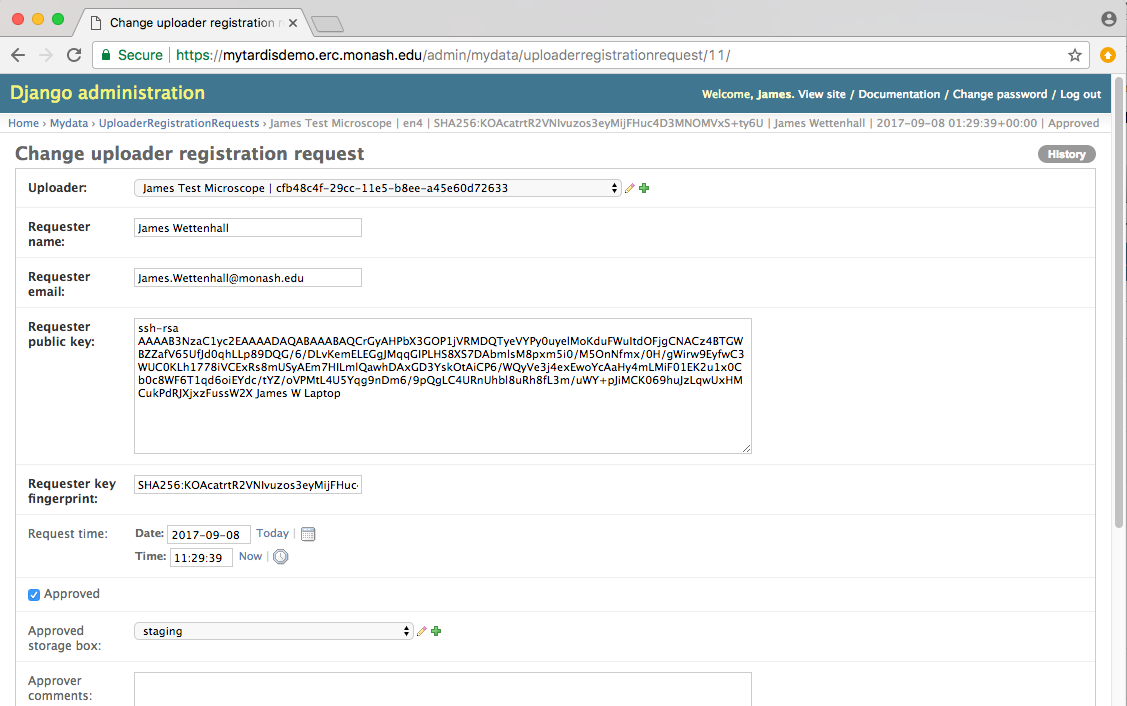
- Navigate back to your_domain/admin
- Select 'UploaderRegistrationRequests'
- Select new entry (should have your name)
- Click "Approve"
- Set 'Approved storage box' to the 'receiving' storagebox
- Copy the 'Requester public key'
- Login or SSH into Ubuntu Mytardis VM
- adduser mydata and paste ssh key into mydata's authorized_keys
- chmod 2770 for 'receiving' directory
- Open MyData and send data - should now send over SCP
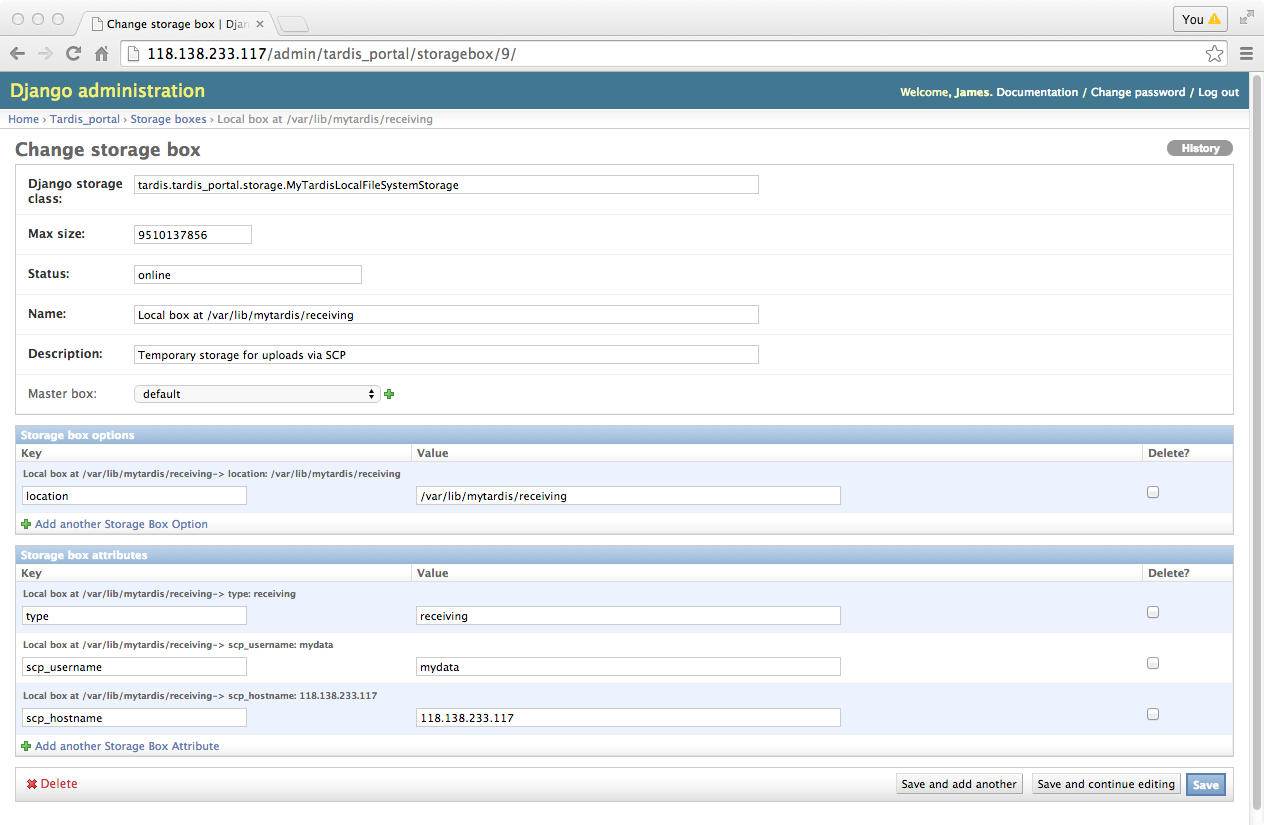
Storage Box Settings (MyTardis Admin)
== default storage box settings ==
max size: 9510137856
Name: default /mytardis/mydata_storage/complete
Description: Default Storage for uploads via SCP
Master box: default
== storage box options ==
location: /mytardis/mydata_storage/complete
== storage box attributes ==
type: default
scp_username: mydata
scp_hostname: spatialmsk.dev
== receiving storage box settings ==
max size: 9510137856
Name: Local box at /mytardis/mydata_storage/receiving
Description: Temporary storage for uploads via SCP
Master box: default
== storage box options ==
location: /mytardis/mydata_storage/receiving
== storage box attributes ==
type: receiving
scp_username: mydata
scp_hostname: spatialmsk.dev
MyData Configs (MyData Desktop Application)
[MyData]
instrument_name = Test Microscope
facility_name = Test Facility
data_directory = D:\Desktop\MyData_Test\MyTardisDemoUsers
contact_name = Mel K
contact_email = melissa.kimble@maine.edu
mytardis_url = https://spatialmsk.dev
username = testfacility
api_key = yourgeneratedapikey
folder_structure = Username / Dataset
dataset_grouping = Instrument Name - Data Owner's Full Name
group_prefix =
ignore_old_datasets = False
ignore_interval_number = 1
ignore_interval_unit = month
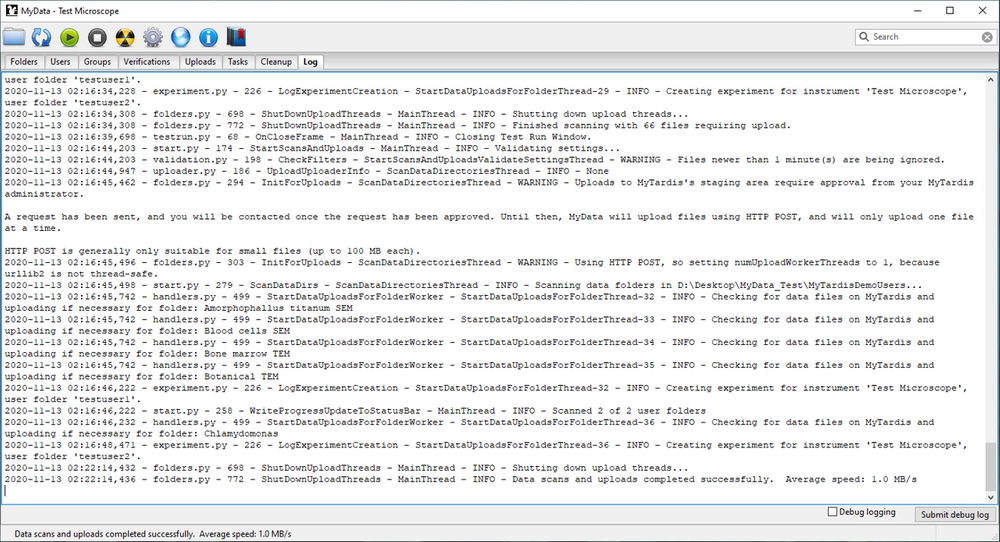
max_upload_threads = 1A 'Test Run' can be done to see what will happen; this is similar to a --dry-run. The nice thing is that a Test Run will also populate UploaderRegistrationRequests in your_domain/admin with your computer's network information and SSH key, which is used when adding the 'mydata' user.
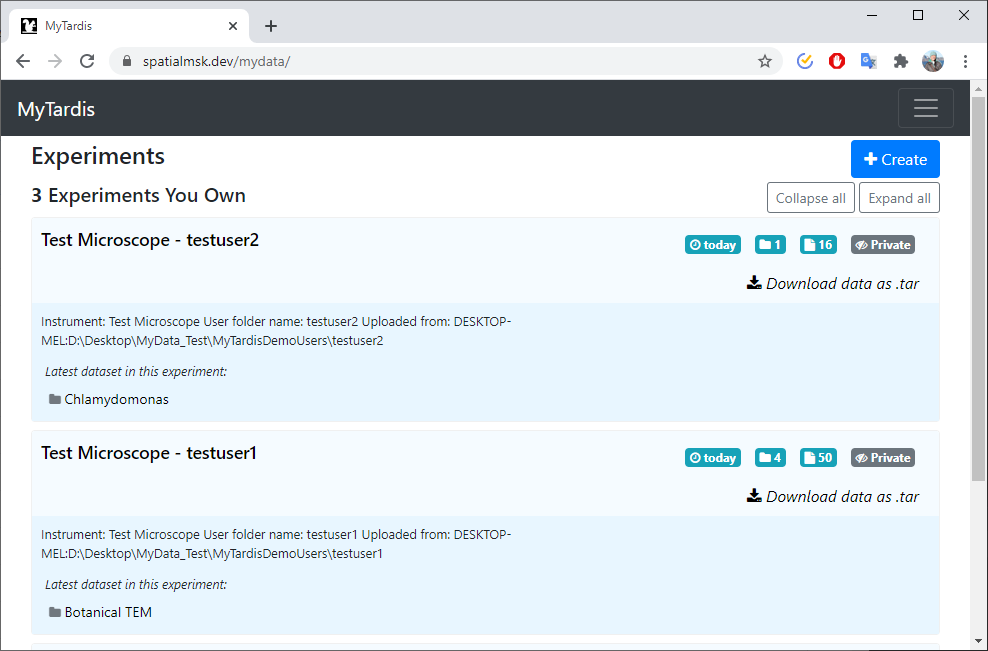
MyData test upload to MyTardis web application
Create mydata user and add ssh key (Upload Methods)
### configure mydata user as root
adduser mydata
mkdir /home/mydata/.ssh
echo "ssh-rsa yourcopiedsshkey melsk@Test Microscope
" > /home/mydata/.ssh/authorized_keys
chown -R mydata:mydata /home/mydata/.ssh/
chmod 700 /home/mydata/.ssh/
chmod 600 /home/mydata/.ssh/authorized_keys
usermod -a -G tardis mydata
# change permissions on receiving folder so that mydata can add new files
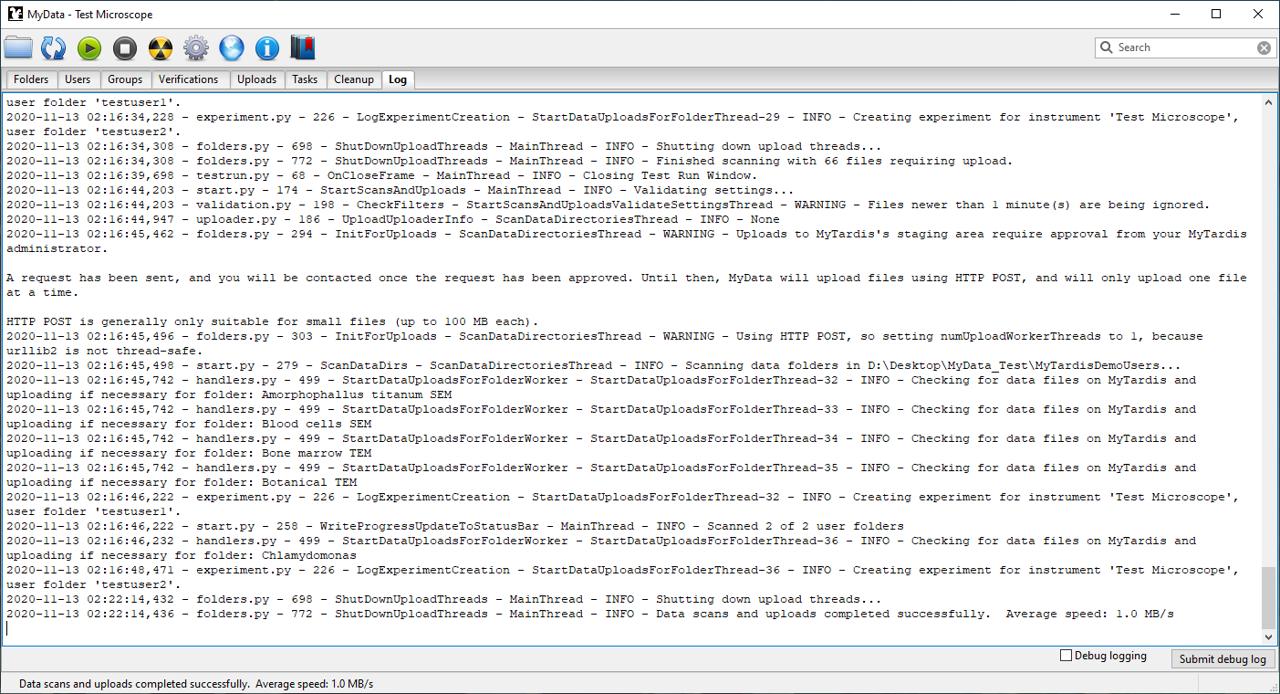
chmod 2770 /opt/mytardis/mydata_storage/receivingMyTardis web application post upload
After SCP is setup, data can be sent by clicking on the play button 'Scan and Upload'. MyData will only upload data that has not yet been uploaded. This can also be set within the settings. Various filters and set times for uploading can also be set. As described in depth in Upload Methods, SCP is preferred because it is less taxing than the default HTTP POST method for uploading data.
All done! You now have an iteration of MyTardis+MyData with PostgreSQL running from your domain. To see what I ran based on this tutorial, please navigate to: spatialmsk.dev
Additional Settings
Some features in MyTardis must be manually enabled and configured. These include things such as Elasticsearch, emailing, and filters. Some settings are as simple as adding a few lines to settings.py, whereas others require installation of additional services. The following contains steps on configuring and installing a few key MyTardis features.
Setup Mytardis Email Module
If you would like to disable user self-registration, remove the registration app from INSTALLED_APPS in default_settings.py and add REGISTRATION_OPEN = False to settings.py.
Otherwise, for self-registration to operate, email settings must be configured:
sudo vim tardis/settings.py...
## Setup SMTP for registration if desired
# Set this to your local SMTP server, e.g. ‘smtp.example.edu’ or to a remote
# SMTP server, e.g. ‘smtp.gmail.com’
EMAIL_HOST = 'smtp.gmail.com'
# Some SMTP servers require a different port, e.g. 587. Django’s default value
# for this setting is 25.
EMAIL_PORT = 587
# If using a remote SMTP server, this can be set to the email address used to
# authenticate, e.g. ‘bob@bobmail.com’
EMAIL_HOST_USER = '[youremail@gmail.com]'
# If using a remote SMTP server, this can be set to the password used to
# authenticate.
EMAIL_HOST_PASSWORD = '[yourpassword]'
# Some SMTP servers require this to be set to True. Django’s default value for
# this setting is False.
EMAIL_USE_TLS = True
# This can be set as : “MyTardis Admins <admins@mytardis.org>”
DEFAULT_FROM_EMAIL = 'MyTardis Admin <youremail@gmail.com>'# Write and quit VIM
:wq!Setting up Elasticsearch
Elasticsearch is the vehicle through which users can query metadata for data they have access to in MyTardis. Elasticsearch also requires at least 2CPUs and it does not work out of the box and requires some additional configuration steps to operate:
Install Elasticsearch
# Installing Elasticsearch
curl -fsSL https://artifacts.elastic.co/GPG-KEY-elasticsearch | sudo apt-key add -

# Add Elastic source list to sources.list.d
echo "deb https://artifacts.elastic.co/packages/7.x/apt stable main" | sudo tee -a /etc/apt/sources.list.d/elastic-7.x.list

sudo apt update

sudo apt install elasticsearch
Configure Elasticsearch
sudo vim /etc/elasticsearch/elasticsearch.yml. . .
# ---------------------------------- Network -----------------------------------
#
# Set the bind address to a specific IP (IPv4 or IPv6):
#
network.host: localhost
. . .# Write and quit VIM
:wq!# Start elasticsearch
sudo systemctl start elasticsearch# Check the status
sudo systemctl status elasticsearch.service
# Check logs
sudo journalctl -u elasticsearch
# Restart and reload after changing elasticsearch.yml
sudo systemctl daemon-reload
sudo systemctl restart elasticsearch# enable startup on server boot
sudo systemctl enable elasticsearchSecuring Elasticsearch
# Configure Ubuntu's default firewall (UFW) for elasticsearch
# 198.51.100.0 or [youripaddress]
sudo ufw allow from 198.51.100.0 to any port 9200

sudo ufw status
Testing Elasticsearch
curl -X GET 'http://localhost:9200'

# JSON output

# To perform a more thorough check of Elasticsearch execute the following
# command:
curl -XGET 'http://localhost:9200/_nodes?pretty'
Enabling MyTardis' Elasticsearch
cd /opt/mytardis

sudo vim tardis/settings.py
INSTALLED_APPS += ('tardis.apps.mydata','django_elasticsearch_dsl','tardis.apps.search',)
...
# Elasticsearch settings; defaults to False
SINGLE_SEARCH_ENABLED = True
# ELASTICSEARCH_DSL default settings - Once Elasticsearch is set up, and
# Single Search is enabled (i.e. the SINGLE_SEARCH_ENABLED option in settings
# is set to True) Elasticsearch DSL will automatically register the addition
# of and changes to models and reflect these in the search index.
ELASTICSEARCH_DSL = {
'default': {
'hosts': 'http://localhost:9200'
},
}
ELASTICSEARCH_DSL_INDEX_SETTINGS = {
'number_of_shards': 1,
'number_of_replicas': 0
}# Write and quit VIM
:wq# activate mytardis environment
workon mytardis
# Elasticsearch DSL registers a number of management commands with the Django
# framework, these commands can be listed by running the following command
python manage.py search_index --help
# the important one here being the –rebuild command. To rebuild, navigate to
# your checkout and call the following command
python manage.py search_index --rebuild
# Elasticsearch DSL will then ask you to confirm your decision (Note:
# Rebuilding will destroy your existing indexes, and will take a while for
# large datasets, so be sure), and then start rebuilding.Setting up Filters
- MyTardis Filters Settings
- MyTardis Filters
- MyTardis Filters Github
- MyTardis Filter docs
- How to Install Docker Compose on Ubuntu 18.04
MyTardis Filters parse uploaded datafiles to verify and add metadata into the database. As with the previous settings, they do not work out of the bag and have been migrated out of MyTardis to be used as a microservice. The following steps configure and add mytardis-filters as a docker image that works with celery and rabbitmq to schedule filtering tasks based on priority.
Install Docker-Compose
# Check for and download the current release
# https://github.com/docker/compose/releases
sudo curl -L https://github.com/docker/compose/releases/download/1.27.4/docker-compose-`uname -s`-`uname -m` -o /usr/local/bin/docker-compose

# set permissions
sudo chmod +x /usr/local/bin/docker-compose

# verify successful installation by checking the version
docker-compose --version
Clone mytardis-filters
sudo git clone https://github.com/mytardis/mytardis-filters.gitBuild the mytardis-filters Docker image
docker-compose upLoad all of the filter schemas into the database
# activate mytardis environment
workon mytardis

# load schemas
python manage.py loaddata tardis/filters/mytardisbf/mytardisbf.json
python manage.py loaddata tardis/filters/fcs/fcs.json
python manage.py loaddata tardis/filters/pdf/pdf.json
python manage.py loaddata tardis/filters/xlsx/xlsx.json
python manage.py loaddata tardis/filters/csv/csv.json
python manage.py loaddata tardis/filters/diffractionimage/diffractionimage.json
sudo vim tardis/settings.py## Filters settings
# If enabled, a task will be sent to RabbitMQ after a file is saved and
# verified, requesting post-processing, e.g. extracting metadata from file
# headers and/or generating thumbnail images.
USE_FILTERS = True
# The default RabbitMQ task priority for messages sent to the filters
# microservice. Priority 4 is slightly less than the overall default task
# priority of 5, defined in tardis/default_settings/celery_settings.py
FILTERS_TASK_PRIORITY = 4# Write and quit VIM
:wq!To test mytardis-filters
docker-compose exec filters flake8 tardis
docker-compose exec filters pylint tardis
docker-compose exec filters python3 manage.py test
Modifying mytardis_ngs_ingestor & mytardis_seqfac to be used as a custom microservice filter
Mytardis_ngs_ingestor and mytardis_seqfac were developed with an earlier version of MyTardis. Their use requires adapting them to be used as filters to automatically parse metadata from NGS uploads.