Cloud Platforms, CentOS 7, and Ghost

This blog sets up a website through the web publishing platform, Ghost. As a caveat, it only sets up Ghost as HTTP. In the future I will add in a blog for implementing an HTTPS website, which is strongly suggested and requires an unseen security handshake to take place to access your website. Italicized sections are comments made by me and do not have to be read.
The following resources were referenced for this blog:
- Initial Server Setup with CentOS 7
- How To Install Node.js on a CentOS 7 server
- How To Install Nginx on CentOS 7
- How To Install and Configure Ghost on CentOS 7
Several other resources are also hyperlinked throughout the remainder of this page.
Part 1 - Setup a virtual machine
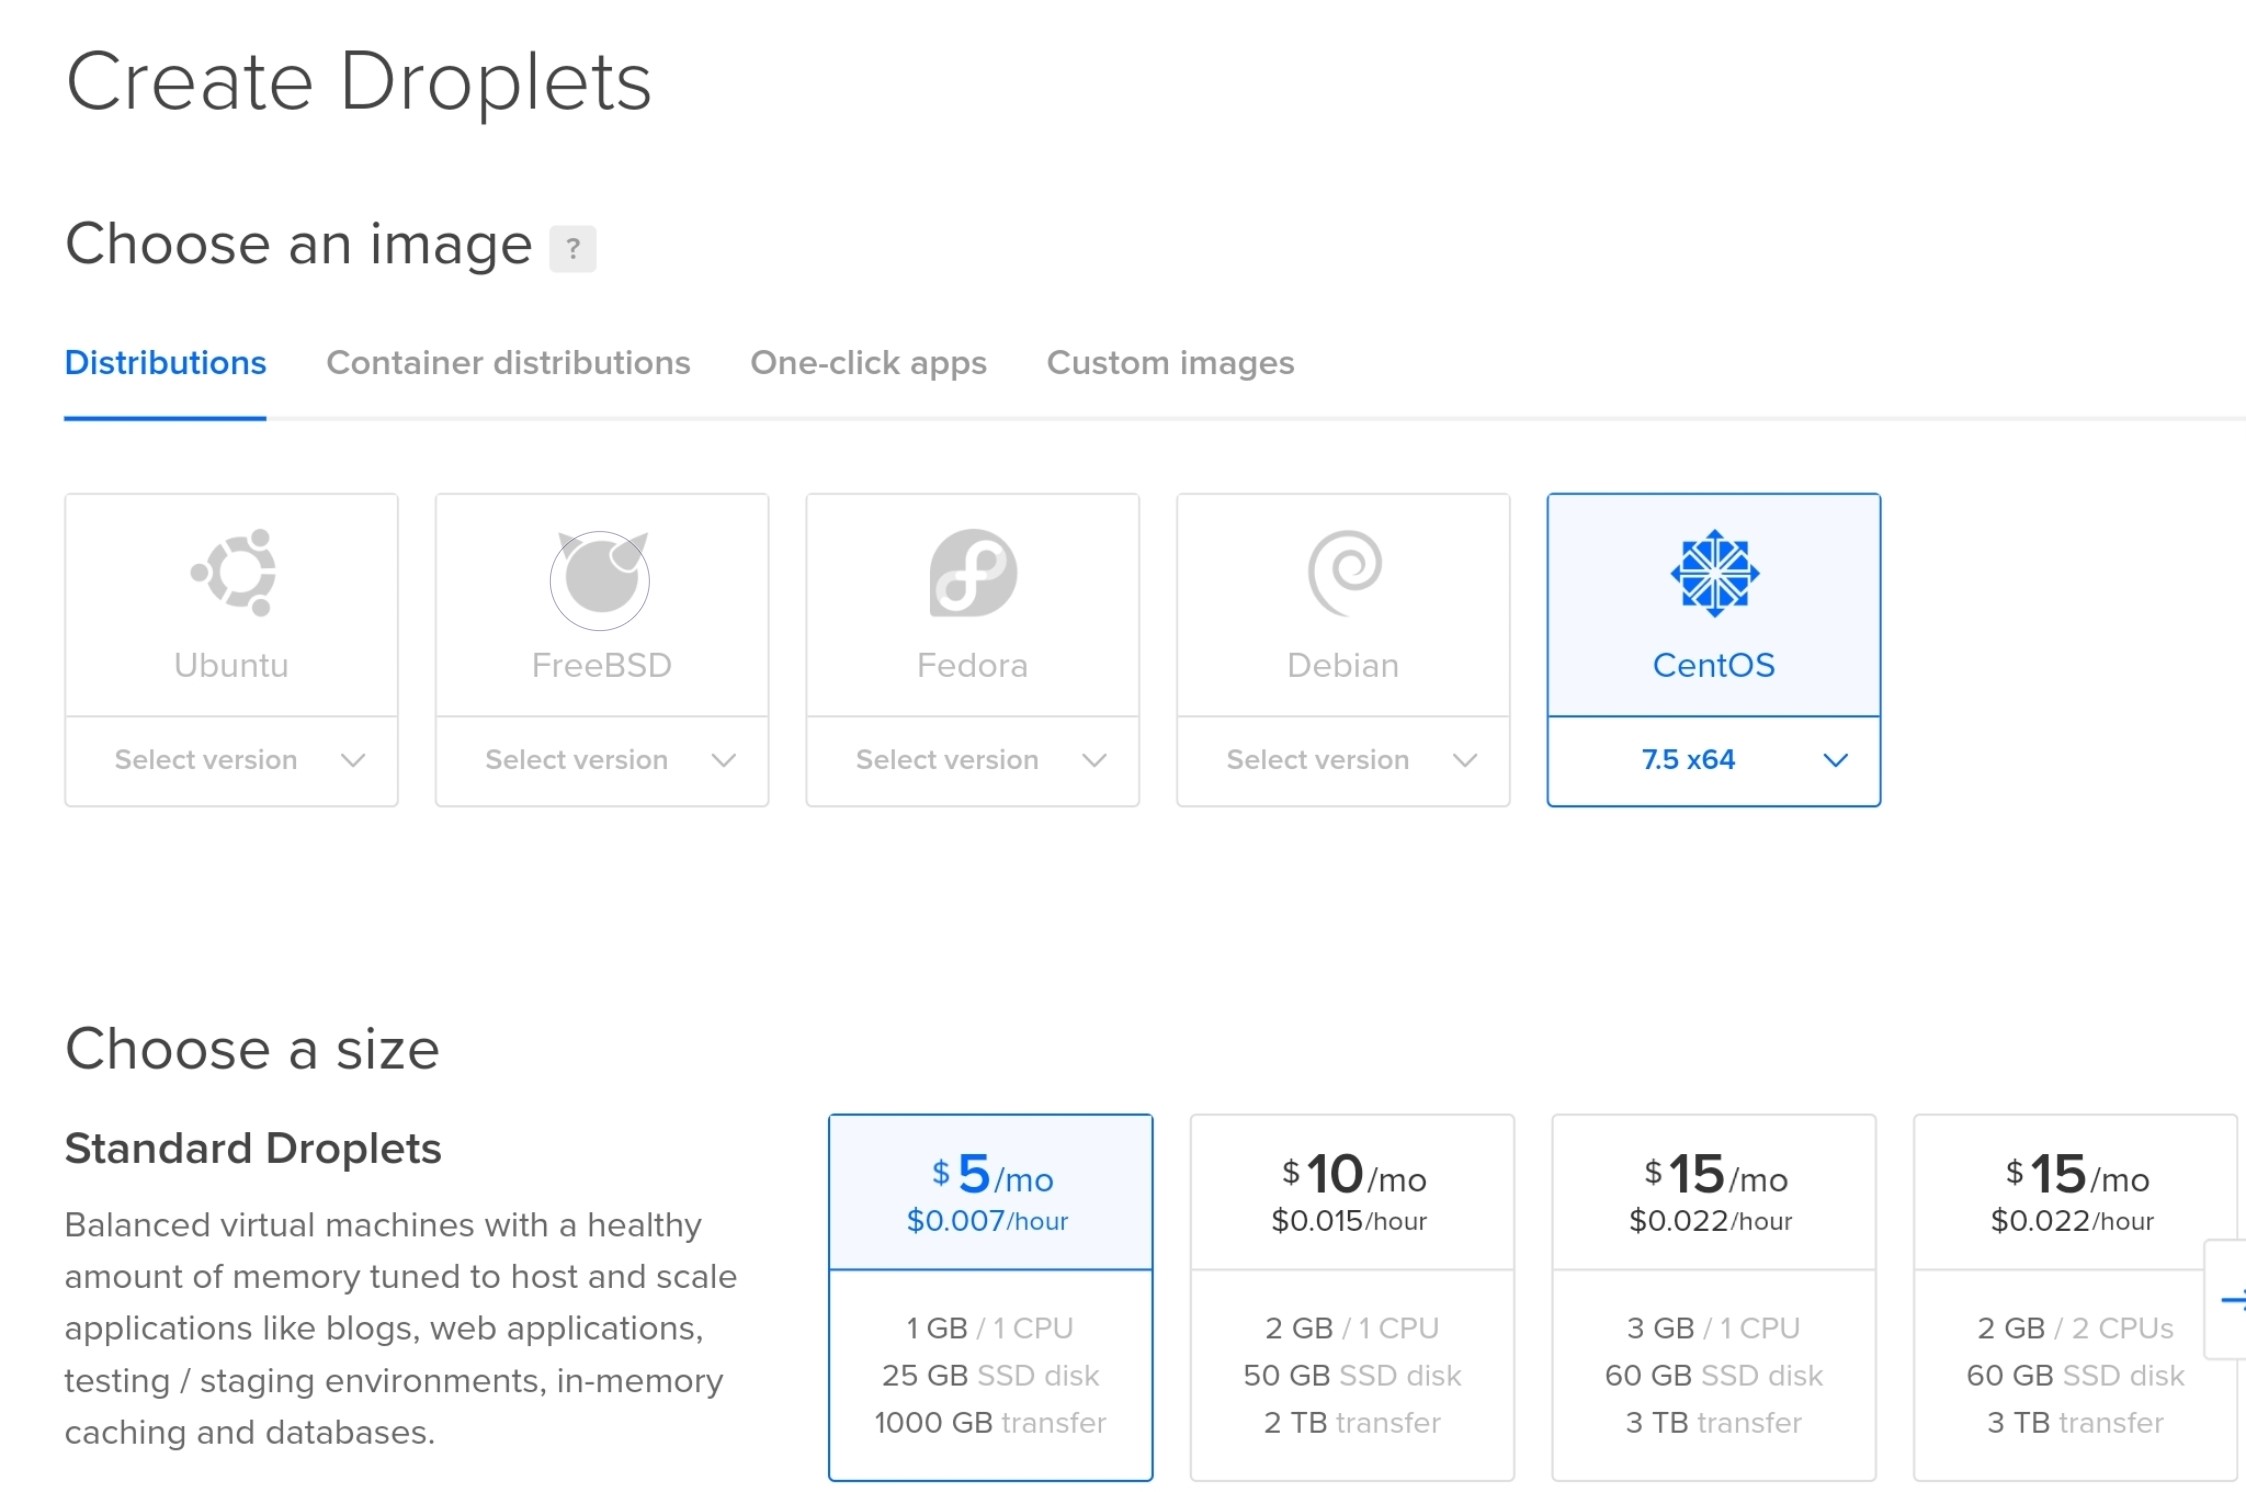
Choose a cloud platform: Amazon Web Services vs. Digital Ocean
Digital Ocean = $5 initial payment, 3 months free, $5/mo thereafter
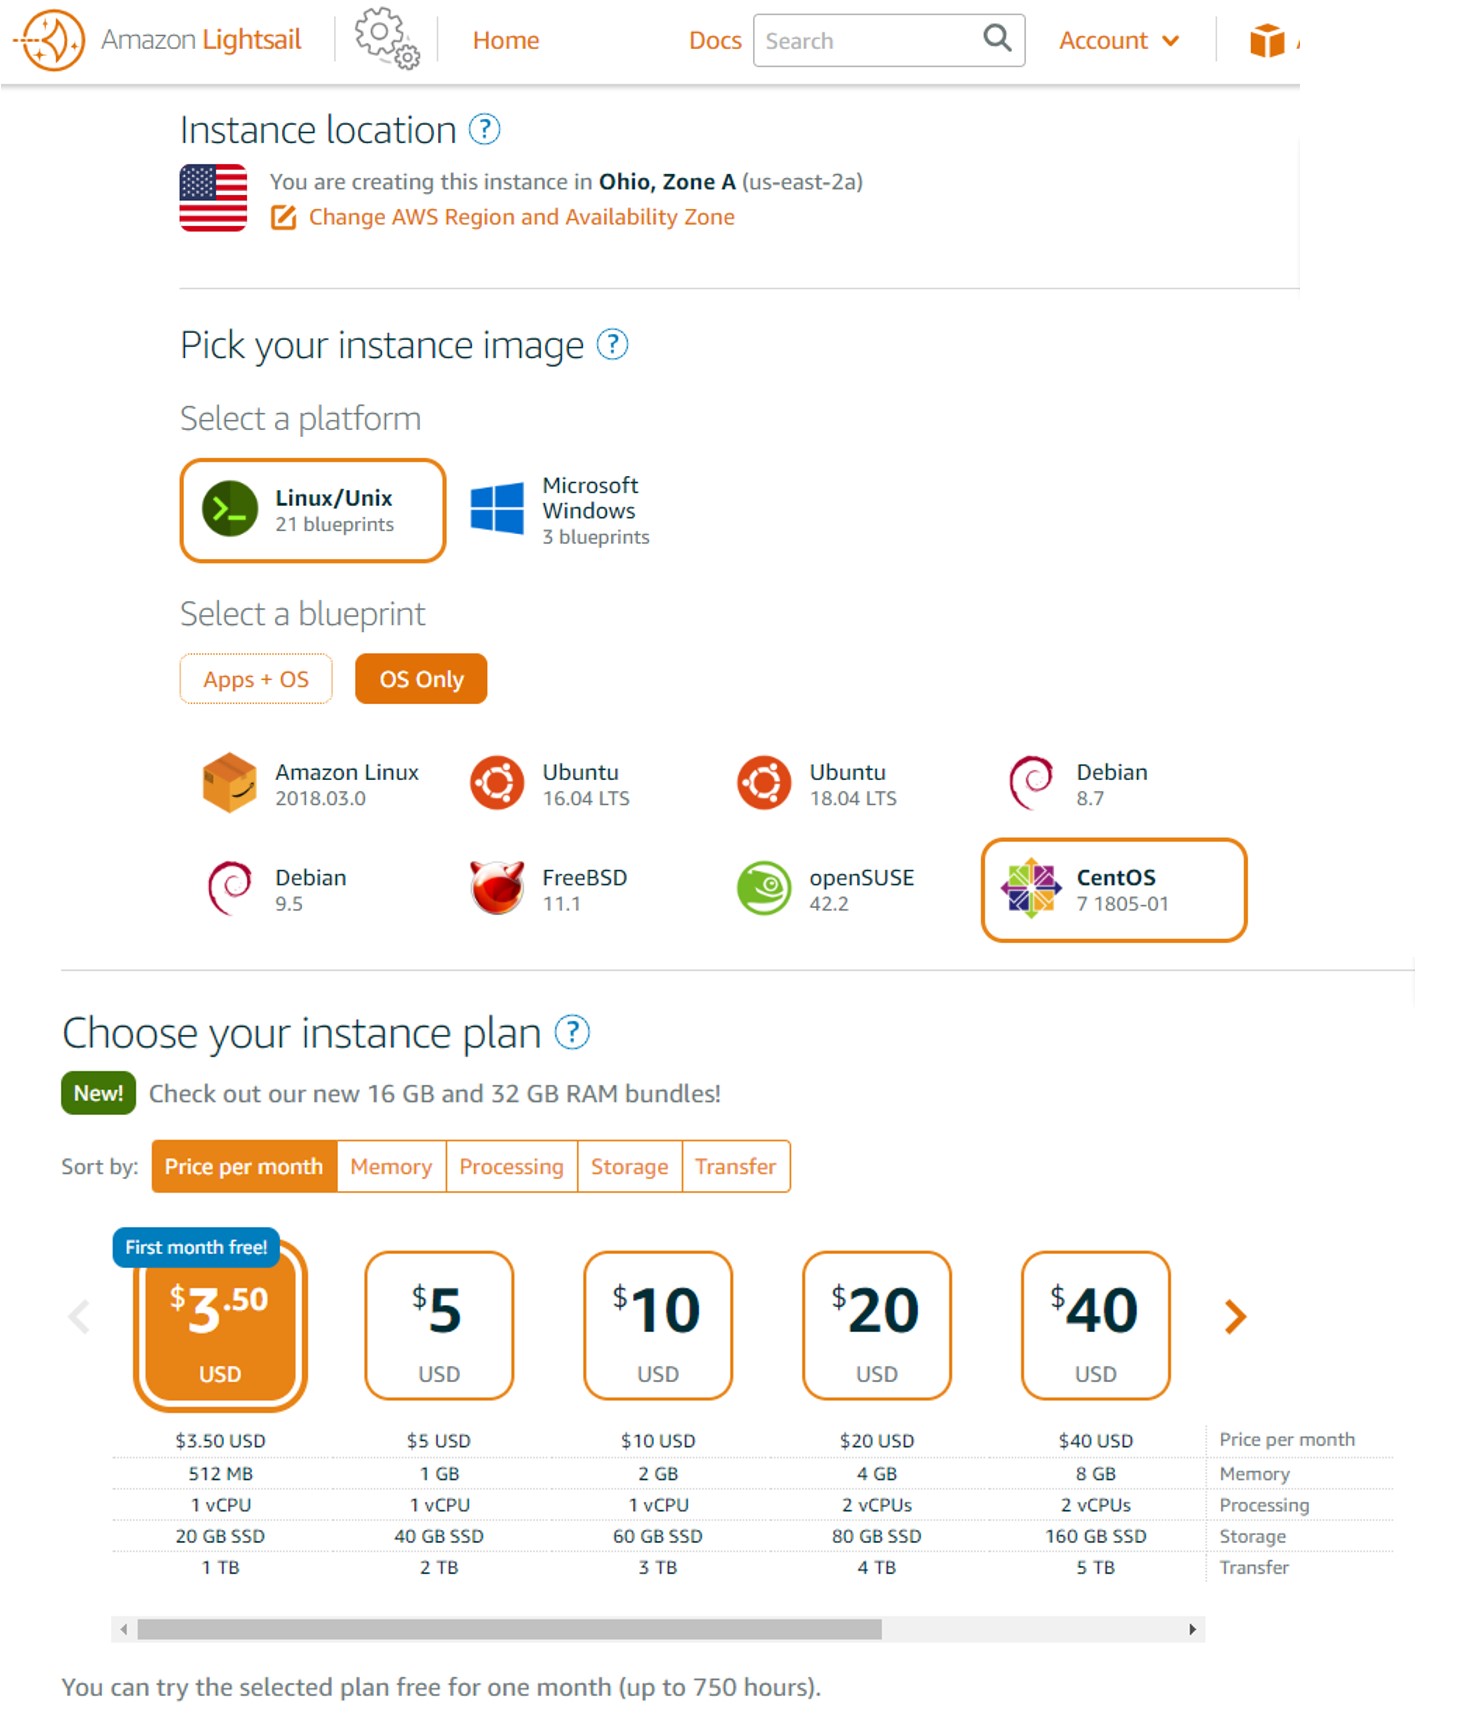
AWS "Free Tier" = 1st month free + $3.50/mo thereafter for cheapest plan, but recommend $5/mo plan (no free month)
*as of 2018-11-29
Create a virtual machine on the cloud platform of choice: CentOS vs. Ubuntu
It wouldn't hurt to try the $3.50/mo plan and see if it suits your needs. I personally prefer Digital Ocean, but AWS has a comparable plan at the same rate. You can choose the CentOS or Ubuntu operating system, but CentOS is used for this demo. AWS is also used in this demo because it requires no up-front cost to start. Acquiring a Google Domain (your web address!) has a minimum annual fee of $12. A Google Domain is not required to host a web page on your cloud platform, but critical security features will not work without it.
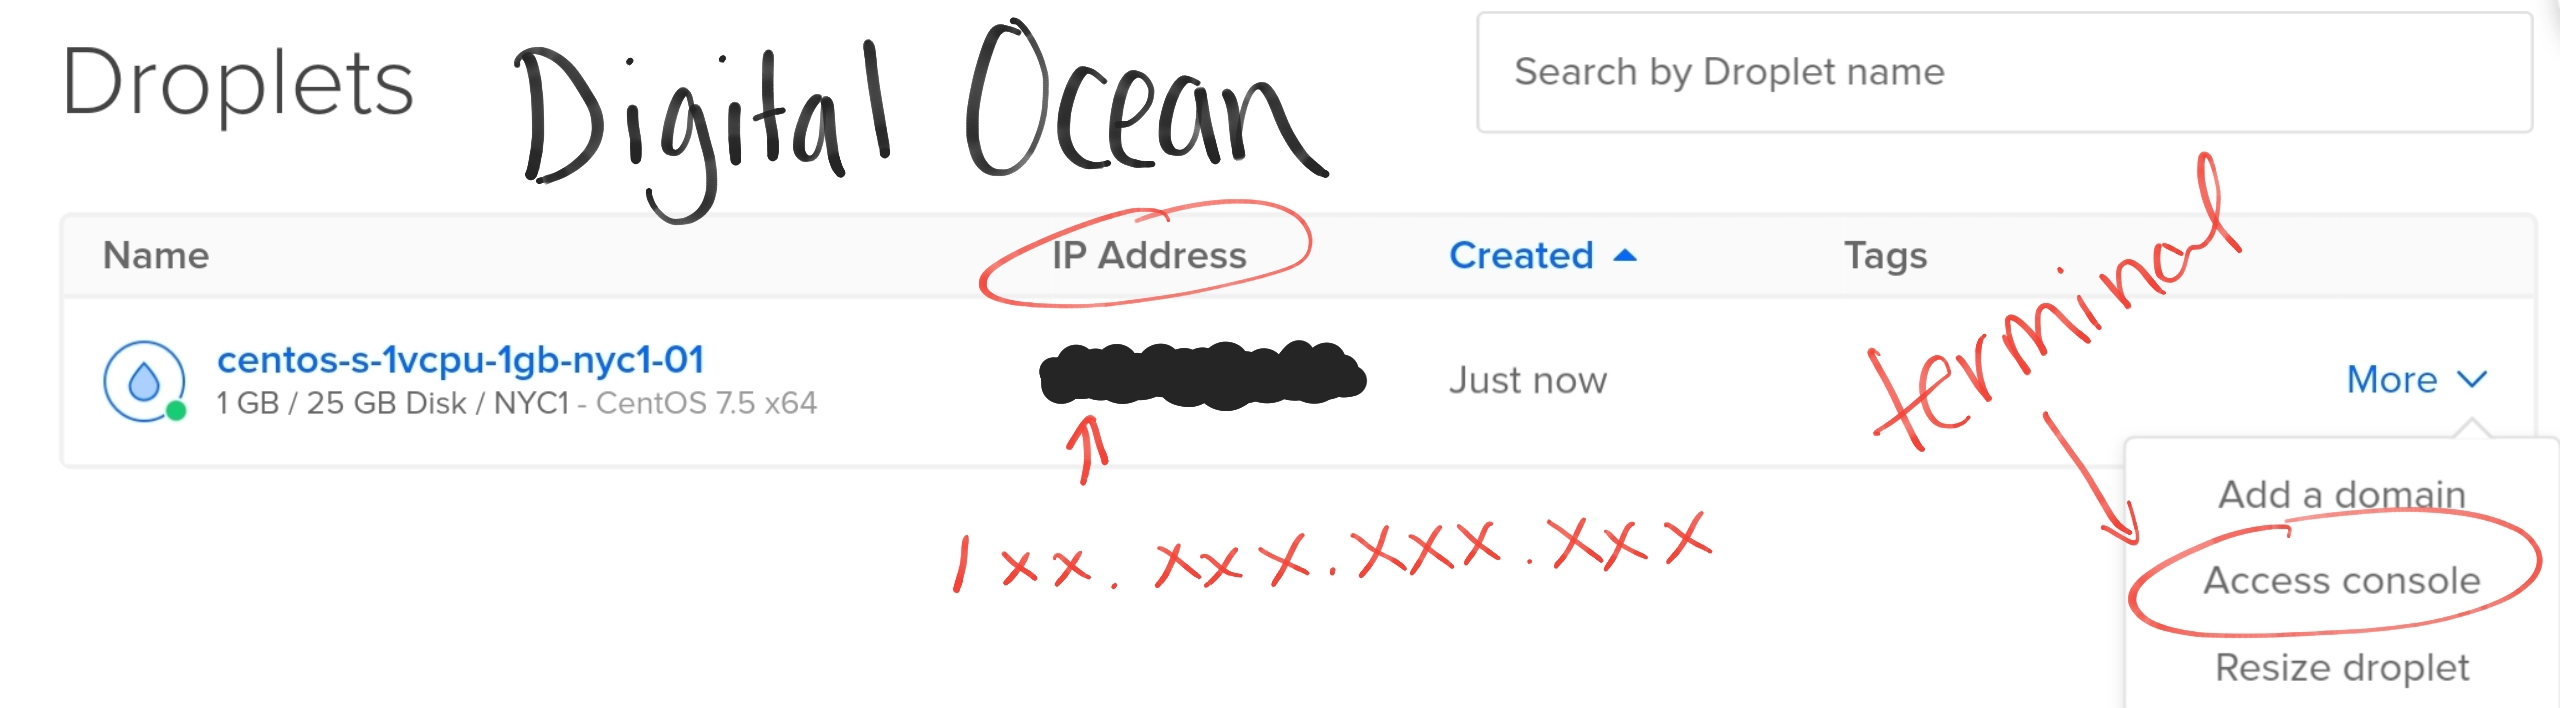
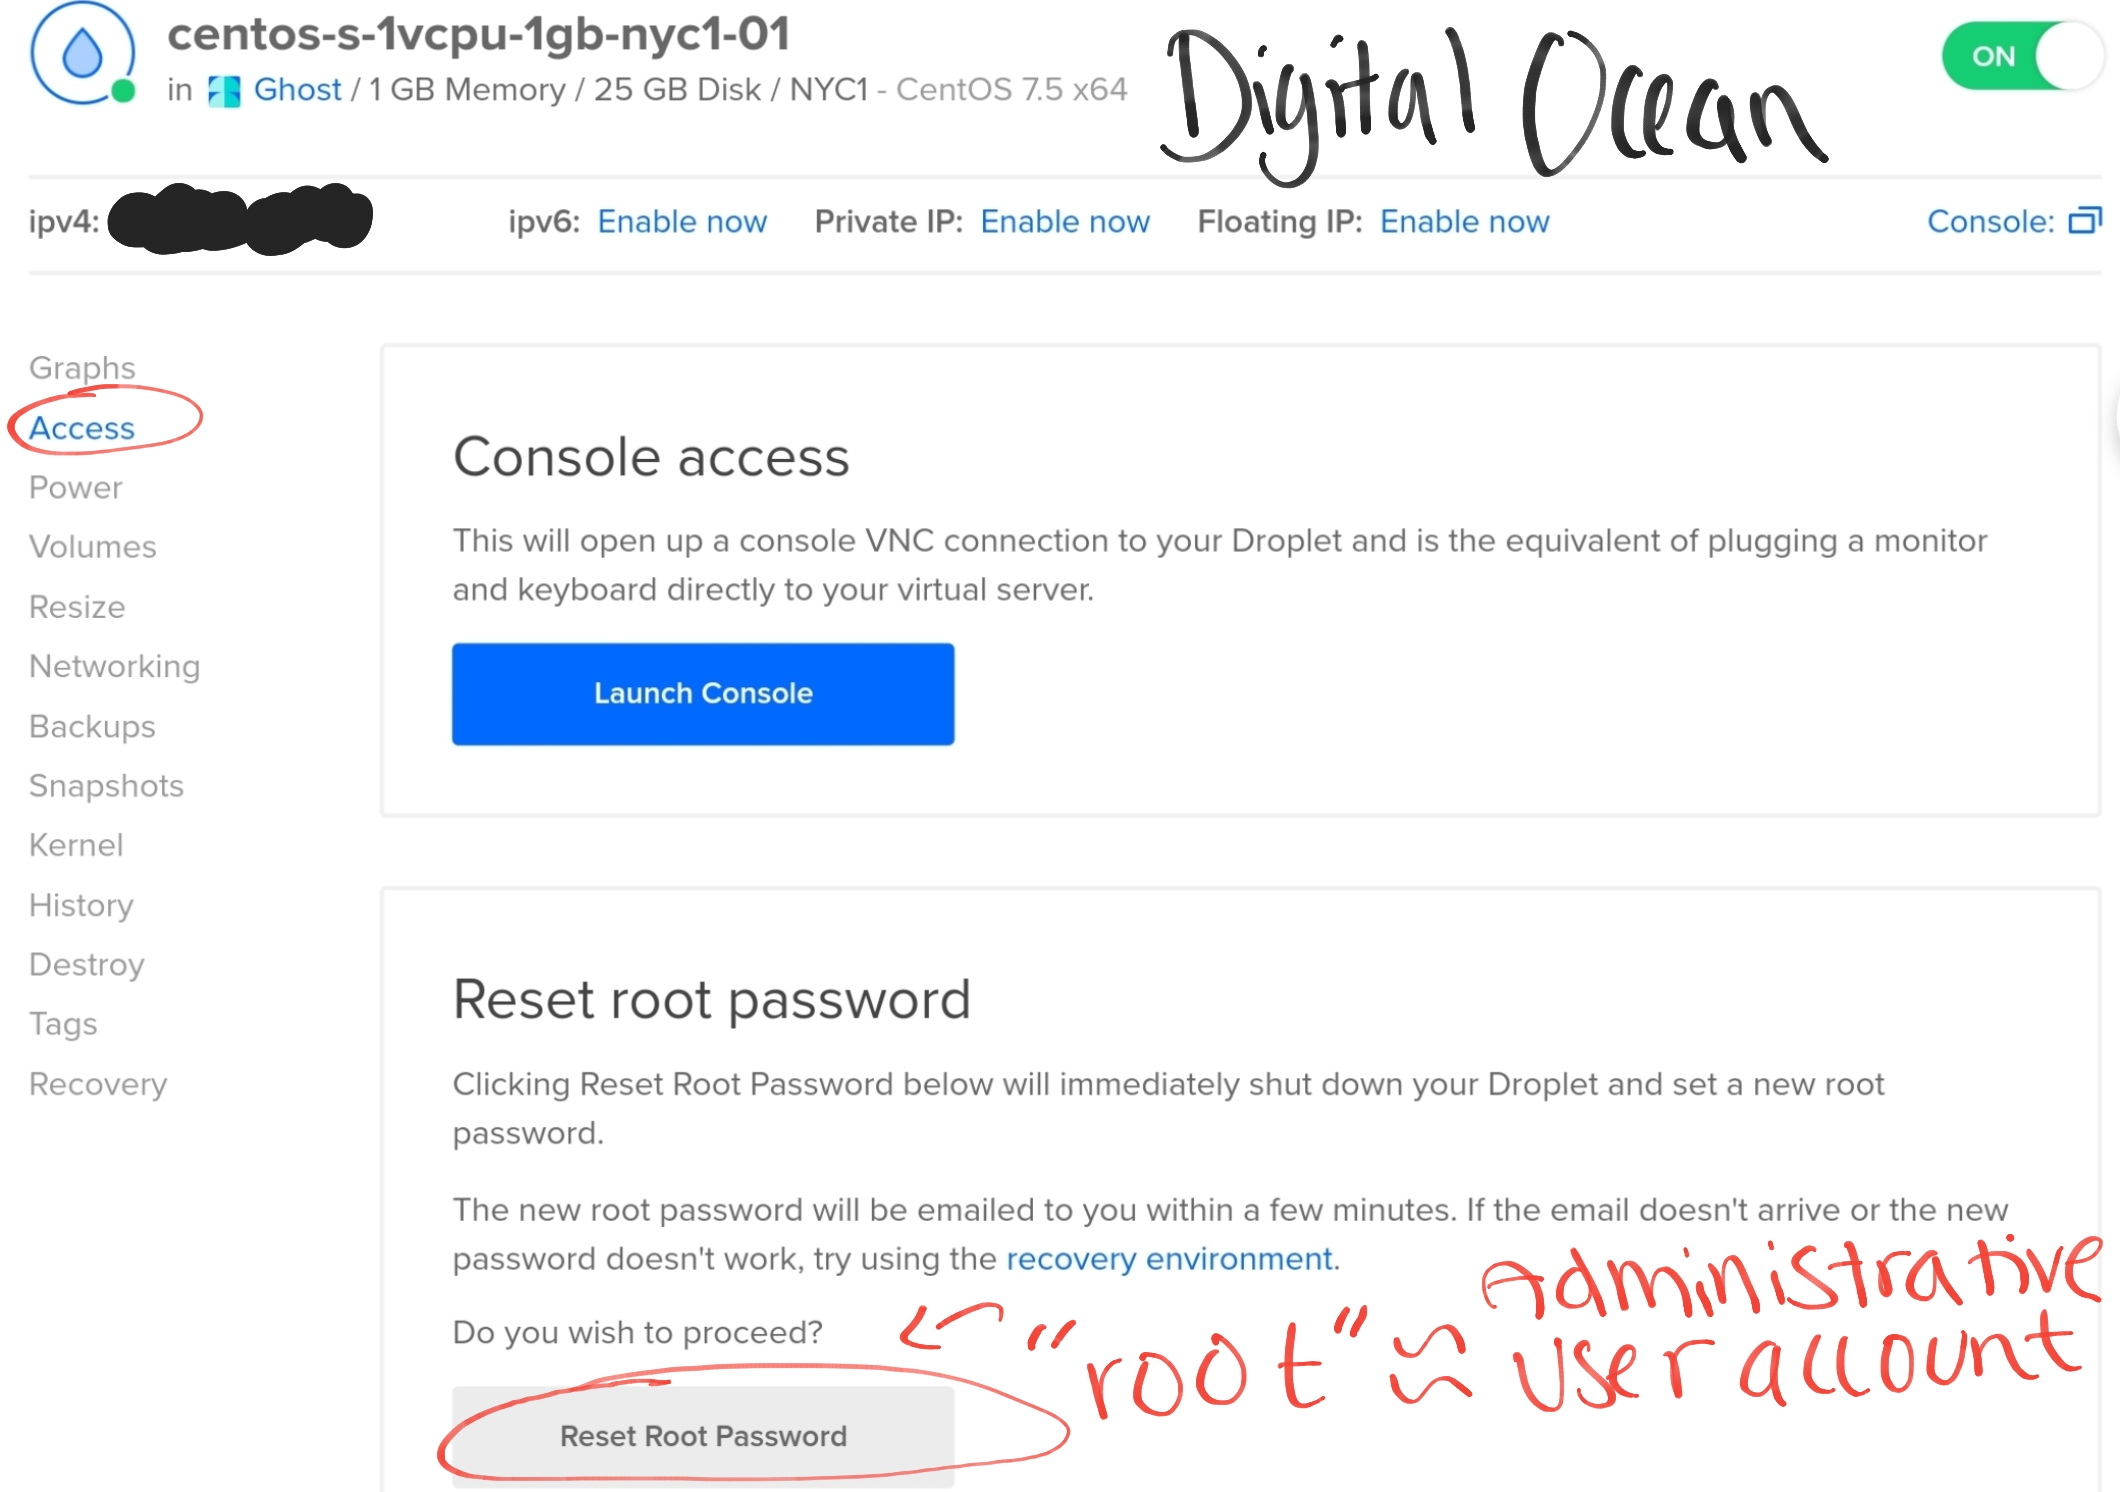
Part 2 - Launch the terminal and/or setup a user
To log into your Digital Ocean droplet, the Root user account password must be reset and accessed via email. Read How to Connect your Droplet with DO Console for more information. The AWS Terminal logs in for you, so you are not required to input a username or password.

Part 3 - Get familiar with Linux and Docker
It is not necessary to type out these commands, but they may be helpful later on. Use this section for reference.
Common Linux Commands (Linux Cheat Sheet)
Go up a level
cd ..
Go into a directory
cd /directory
Go to $HOME directory
cd
Display current directory
pwd
List all files
ls -al or dir
Make new directory
mkdir [directory]
Delete a file
rm [file]
Remove a directory and all of its contents
rm -r [directory]
Common text editor commands: vi or vim
Some basic vi (or vim) commands
Open a file
vi [filename]
Insert into text
i
To leave insert mode, press < Esc >
Exit without editing
press : (colon), then
q!
Exit and save changes
press : (colon), then
x!
Common Docker Commands (Docker Cheat Sheet):
Docker syntax docker [option] [command] [arguments]
Download images docker pull [image]
Run images docker run [arguments] [image]
List containers docker container ls or docker ps
Restart container docker restart [container-id]
Stop container docker container stop [container-id]
Remove container docker rm [container-id]
Enter a container docker exec -it [container-id] bin/bash
Exit a container exit
Containers are the running image, while the image is the downloaded program. Exchanging 'container' with 'image' will run the same commands on the images.
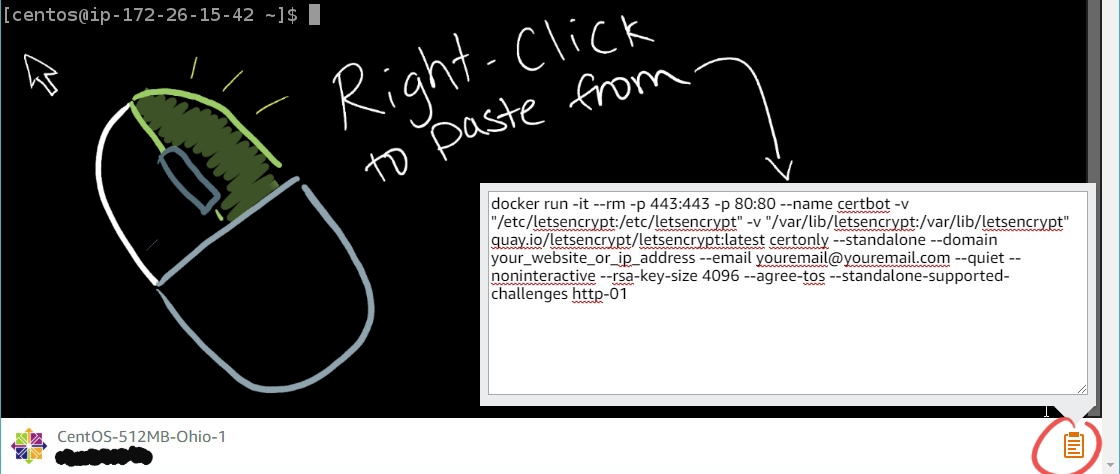
Handy copy/paste feature from Amazon Web Services's web terminal!
For the remainder of this workshop, I will be using the Amazon Lightsail's Terminal. Typing out full commands from the browser can be super frustrating, but Amazon Lightsail has a handy tool for copying and pasting in text. Along with the right-click paste, you can also highlight text in the terminal, click on it with the left-click and right-click paste.
Docker and GitHub are repositories that host open source computer code that can be 'downloaded' and used in your virtual machine. Docker is a bit different from GitHub, because Docker itself is a program that encapsulates operations into [sort of] independently operating building blocks (containers) within your virtual machine. Docker enables you to run pre-specified software as packages that are essentially good to go right off the shelf, sort of like when you download and install a program on your Windows or Mac computer. Often code from GitHub is dockerized and downloadable by a Docker Pull command. If you want to be able to download and pull all software packages you want running on your virtual machine at once, Docker-Compose files are handy in that Docker will read them through a docker-compose command and install them all at once. We don't use one in this blog, but it will be downloaded for future use if you are interested in pursuing that route.
Part 4 - Setup Docker repository access
Setup docker to run on CentOS 7
sudo yum check-update
curl -fsSL https://get.docker.com/ | sh
sudo systemctl start docker
sudo systemctl status docker
sudo systemctl enable docker
sudo usermod -a -G docker $USER
exit
Reconnect - now we can run docker commands
How To Install and Use Docker Compose on CentOS 7
sudo yum install epel-release
Is this ok [y/d/n]: y
sudo yum install -y python-pip
sudo pip install docker-compose
sudo yum upgrade python*
Is this ok [y/d/n]: y
Part 5 - Setup GitHub repository access
Setup Git on CentOS 7
sudo yum install git
Is this ok [y/d/n]: y
Check the version to make sure git was installed:
git --version
Part 6 - Google Domains & a Pizza Break!
Food for thought: Serving a website on a registered domain with HTTPS using Nginx and Let's Encrypt
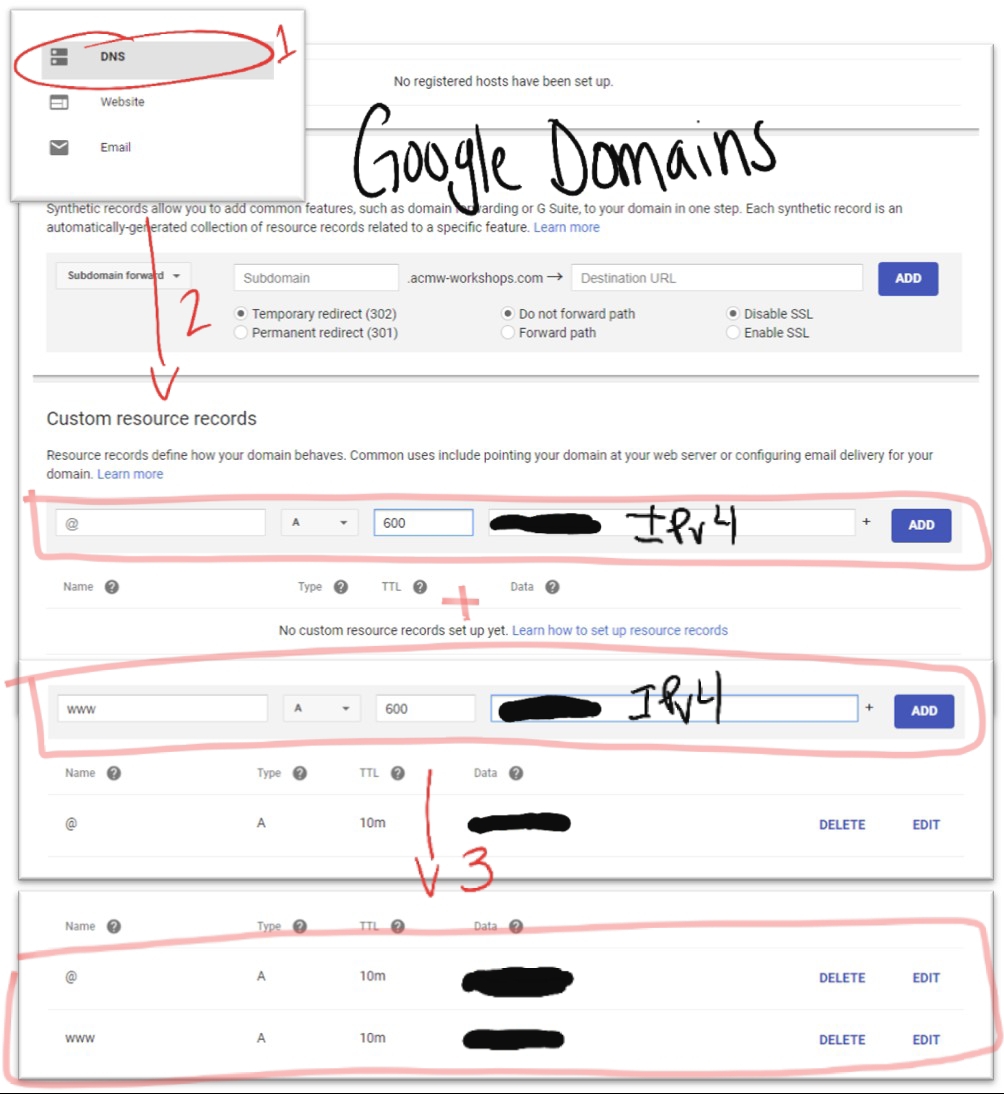
Use Google Domains (or your domain registration service of choice) to select a new domain name (the name of your website). Minimum domain fee is $12/yr at Google Domains.
Once you've selected your domain name:
- Click on DNS in the left hand panel
- Scroll down to Custom resource records
- Add @ and www:
NAME: @
TYPE: A
1H/TTL: 600
IPv4 address/Data: your_public_IP_address
NAME: www
TYPE: A
1H/TTL: 600
IPv4 address/Data: your_public_IP_address
Part 7 - Pull (download) Node.js, an open-source javascript library for client-side and server-side scripting
docker pull node:8.12.0-alpine
Part 8 - WAIT and read the following before you run Ghost, a web publishing platform that is built on Node.js
Replace all instances of "yourdomainname" with the domain name you picked from your domain registration service of choice.
If you accidentally continued and did not change "yourdomainname" to your own, you will have to LIST, STOP, and REMOVE the container based on its container-id (see Common Docker Commands for reference) and run the run command again with the appropriate changes.
docker run -d --name ghostblog -v ghostblog:/var/lib/ghost/content -e VIRTUAL_HOST="yourdomainname.com,www.yourdomainname.com" -e VIRTUAL_PORT=2368 -e url=http://yourdomainname.com ghost:2.1.3-alpine
list docker containers - see, it's running!
docker container ls
Part 9 - Pull & run Nginx, a web server that handles internet traffic for your website
dmp1ce/nginx-proxy-letsencrypt
docker pull dmp1ce/nginx-proxy-letsencrypt
docker run -d --restart=unless-stopped --name nginx -p 80:80 -p 443:443 -e TERM=xterm -v /mnt/certs:/etc/nginx/certs -v /var/run/docker.sock:/tmp/docker.sock:ro dmp1ce/nginx-proxy-letsencrypt
Port forwarding on router for ports 80 (http) and 443 (https)
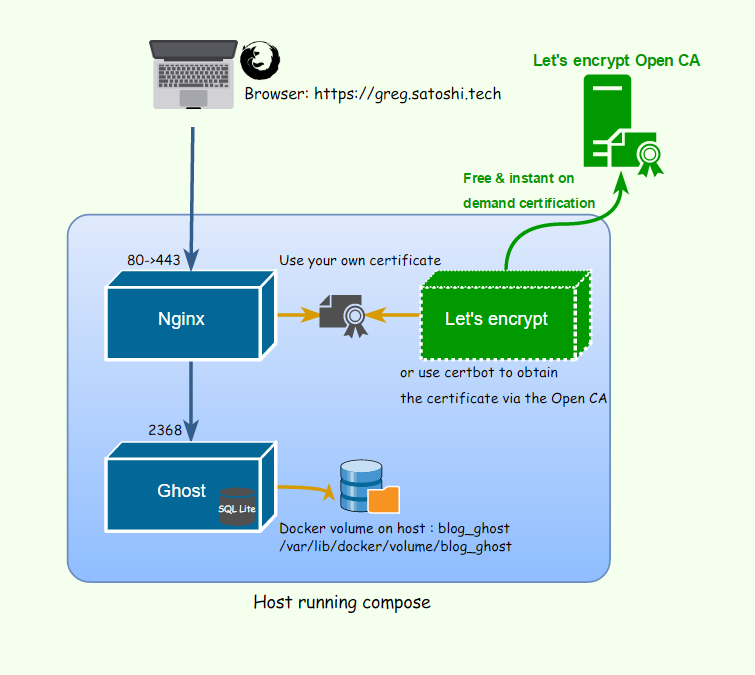
This website is up and running, but it is not set up for https, which requires a "security-handshake" between the DNS (google domains) and an SSL encryption key provided by letsencrypt. Let's just say technical difficulties were prohibitively complex and frustrating, but for the purpose of this workshop you will have a working website to mess around with.
Great figure from gregbkr at GitHub:
Part 10 - Ghost Themes (optional)
Copy a theme from a GitHub repository
git clone https://github.com/raivis-vitols/ghost-theme-willow templates/willow
Copy it to Ghost and restart it
docker cp ghostblog/templates/willow ghostblog:/var/lib/ghost/themes/
More themes at Ghost Themes